Showing posts with label Simple nail art. Show all posts

Monday, 18 June 2012

Simple nail art 4 ...

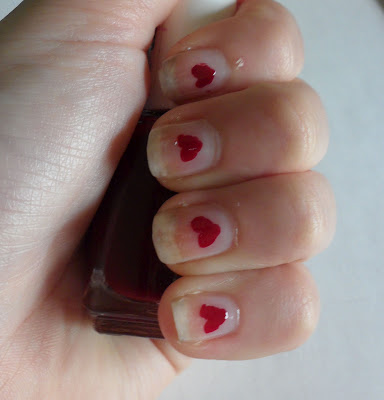
I thought I would try out another simple nail art technique today. I have always wanted to be able to paint hearts on my nails but never really got how to do it because I don't have the steadiest hands, but my friend showed me her way of doing it and so I adapted it to suit me and I thought I would share it. 

Firstly, I painted my nails with a sheer pink nail colour, I used a french manicure colour from an 
old set I found, so you don't need anything special. 

Then, with my chosen heart colour, I picked Bordeaux by Essie, I did one dot for the base of the heart. 
I then painted one dot with the brush up and to the left of the first one, and then dragged it down to the base dot, to make the left half of the heart. 
And then finally, I did the same for the right half, creating a little heart. 
You could then add a top coat and voila! I found this was an easy way to create simple hearts but if you know of any others feel free to let me know! This technique was also made easier because my Essie polish is an original one, rather than the diffusion line, so the brush was smaller and easier to manage. Overall, I think these are quite cute and although they aren't perfect I will be trying this out again with different colours.

xxx


Wednesday, 23 May 2012

Simple nail art 3 ...

I have been really enjoying simple nail art recently, so I thought I  would give another idea from  The Beauty Department a go. I found this really easy to do, and I really like the finished effect.


To do this nail art, you will need:
A base colour (I chose 424 - Bordeaux from Essie)
A colour for the detail (I chose Rimmel - Black Cab)
A dotting tool (Bought or homemade)


Firstly, I thought I would show you how I made the dotting tool, which I found instructions for on the Beauty Department website. To do this I used a pencil with a rubber on the end, and a normal dressing pin. I then put the pin in the rubber and voila! a dotting tool! 


After applying the base coat you can now add the dots to the 
base coat using the dotting tool. I did it by putting some of the nail polish onto a scrap piece of paper and then dotting the pin into it, but I'm sure several ways work equally well. I did it in a random pattern, but more dense at the nail bed becoming more sparse towards the end of the nail. I really like this effect, I think it's pretty subtle but different, and I'm definitely going to try this technique with different colours. 


Thursday, 17 May 2012

Simple nail art 2 ...


I first saw this look on the Beauty Department website (click here ), and thought that it looked really interesting and unique, so I thought I would give it a go. I used three nail polishes and self adhesive washers. The colours that I used for this  nail look are the ones that are free with InStyle magazine by Nails Inc. They are Powder Pink, Bluebell and Peach Sorbet. This technique is quite easy to do but there are some pitfalls. Firstly, you paint the base coat, which in this case is Powder Pink and wait for it to dry (after applying the normal clear base coat). This is important because if you apply the self adhesive washers when the nail polish isn't dry, when you take them off the nail polish will come straight off too. Not ideal. After applying the first set of adhesive washers in a peak design, apply the second coat of nail varnish and wait for it to dry before peeling off the washers. Then apply a second set of washers and the third colour of nail 
polish and wait for it to dry. Finally, peel off the washers and apply a top coat to make the nails look shiny, and it also evens out any ridges between the colours nicely. I really enjoyed doing this design, and it was really easy to do. The Beauty Department have some really interesting ideas, and is definitely worth taking a look at. Some things to watch out for if you want to try this yourself are peeling off any of the base colours which can look so messy but is so easy 
to do, so make sure the bottom 


colours are properly dry before applying the adhesive washers. Also, be very careful when you are peeling off the washers as they can pull the design of the upper coat and make it look a bit misshapen. Finally, take care to make sure the peaks are in line with each other so it looks like a uniform design. I have tried this with other colours and I would definitely recommend doing this if you are interested in doing some simple but unique nail art.   


L-R: Powder Pink, Bluebell, Peach Sorbet (all Nails Inc for InStyle)
Self adhesive washers


L-R: Essie Capri, Topshop World's End, Nails Inc Bluebell


xxx